

How it works
Nectar sends Sphera one row per usage row on a bill. Each row carries the Sphera site it belongs to (site external id), the kind of data it is (sphera utility type 1 and sphera utility type 2), the service period, and the usage with its unit.
In Sphera, the import mapping on your Data Import channel decides where each row lands: which questionnaire, and which question (position) inside it. Nectar then reads those stored values back through the Data Acquisition channel and compares them with your Nectar data month by month.
Every organization structures its questionnaires differently, so there is no single correct mapping. You tell Sphera where each data type goes, then tell Nectar the same thing so it compares the right questions.
Channels
Sphera exchanges data over channels. Nectar uses two, and each has its own GUID, connection key, and connection secret.Step 1: Get your Sphera credentials
Open the Connection Center
https://yourcompany.cs.spheracloud.net) and confirm the product switcher is on Corporate Sustainability. In the left navigation, expand Management and click Connection Center, then expand the Channels section.The Channels table lists every channel with its Type, Name, Online checkbox, and Auth Type. Nectar uses WSSE, which is Sphera’s default.Find or create the Data Import channel
Data Import. If your administrator already created one for Nectar, open it and skip to the next step.To create one, click the + dropdown at the top right, choose New Channel, and set:- Type — Data Import
- Name — anything recognizable, for example
Nectar upload channel - Online — leave checked. An unchecked channel rejects incoming data.
- Save on behalf of — a Sphera user with write access to every site Nectar will push to. Imported data is written under that user’s permissions.
- Mapping — the Sphera import mapping that matches Nectar’s CSV column names. Create it under Mappings first if none exists.
- Transformer — leave blank. Nectar sends a flat CSV that needs no transposition.
Find or create the Data Acquisition channel
Data Acquisition. This channel is read-only, so it has no Mapping or Transformer field. Set Save on behalf of to a user who can read the sites and questionnaire data you want to compare.Copy the GUID, key, and secret
Map Sphera values to Nectar fields
Step 2: Set up the import mapping in Sphera
The import mapping tells Sphera which field each column in Nectar’s file fills, and where each row belongs. In the Connection Center, open Mappings, create a mapping, and select it as the Mapping on your Data Import channel. For each column Nectar sends, choose the Sphera field it fills. At minimum:site external id— set Property to the site attribute that holds this ID, so Sphera can match each row to its sitestart dateandend date— the period fields. Nectar sends dates asYYYY-MM-DD.usageandusage units— the quantity and its unit. Add a value mapping (the table icon next to the column) from Nectar’s unit names, such askWhorthm (US), to the matching Sphera units.sphera utility type 1— add a value mapping from each Nectar data type to the questionnaire it belongs insphera utility type 2— add a value mapping from each Nectar data type to the question (position) inside that questionnairenectar audit link(optional) — map it to a text field so every value in Sphera links back to its bill in Nectar
charges units from Nectar’s currency codes, such as USD, to Sphera’s currencies. For data quality, add a value mapping on are 1+ readings estimated from True to Approximated and False to Exact. Nectar also sends term and the per-meter allocated cost after all the other columns. See Sphera-ready columns.
sphera utility type 1 and sphera utility type 2 value mappings. Nectar uses it to build the usage comparison and to pick each row’s reporting period for the term column.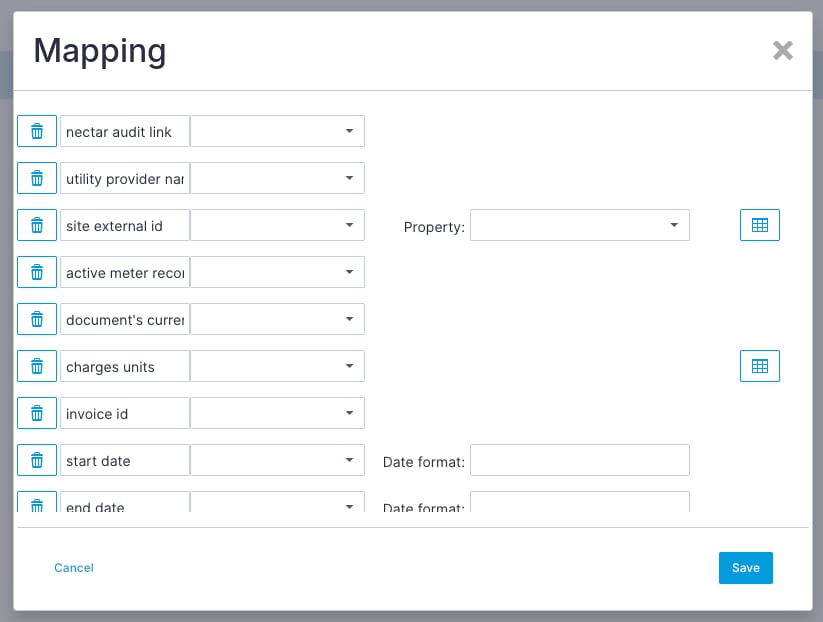
The import mapping lists each column Nectar sends. Pick the Sphera field for each one; the table icon opens its value mapping.
ELECTRICITY or GAS, a water type such as WATER_MUNICIPAL_WATER, a fuel type such as PROPANE_GAS, or a waste stream such as WASTE_Landfill (named after your company’s waste streams; waste without a stream is WASTE). Map the values that appear in your data. You can map any other columns you want to keep, such as the invoice ID or utility provider name.
To report on-site solar or other generation separately from purchased electricity, route on sphera utility type 3 instead. It sits right after sphera utility type 2 and carries the same value, except that generation meters send ELECTRICITY_GENERATION. Types 1 and 2 are unchanged, so generation still arrives as ELECTRICITY there.
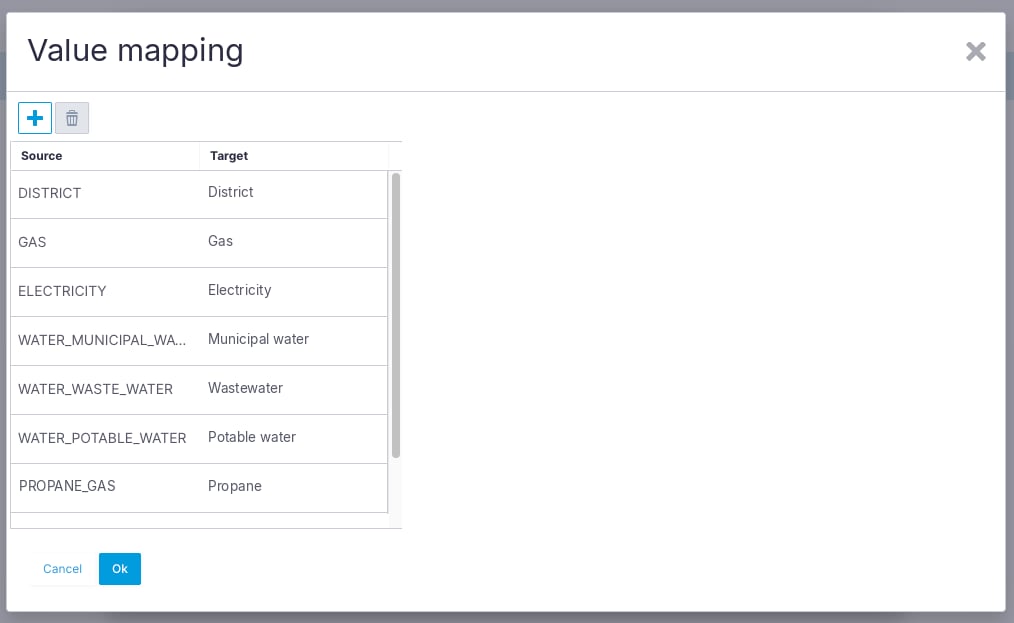
A value mapping for sphera utility type 1: each Nectar data type on the left, the questionnaire it goes to on the right.
Step 3: Connect Nectar to Sphera
Go to Data Export > Integrations > Sphera and start the setup wizard. If the integration already exists, edit it from Settings > Company > Integrations > Sphera instead.- Channels — Enter your Sphera host and API route, and turn on the Data Acquisition (DA) channel toggle if you have one.
- Credentials — Paste the GUID, connection key, and connection secret for each channel. Verify & continue tests every channel against the live Sphera API, saves the configuration, and discovers your Sphera sites through the DA channel. Site discovery can take a minute.
- Site mapping — Match each Nectar site to its Sphera site. Smart match suggests pairings by name, and you can exclude sites you never want pushed. On the same step, map your data types (see below).
- Review — Confirm the host, channels, mapped and excluded site counts, and mapped data types, then Finish setup.
Map data types to Sphera questions
For each data type, choose the Sphera questionnaire and the question inside it, the same way you mappedsphera utility type 1 and sphera utility type 2 in Step 2. The same questionnaire applies to every site. When a questionnaire has only one question, Nectar selects it for you. If you route generation on sphera utility type 3, also map Electricity (generation) so the comparison shows generation under its own question; until you do, generation usage stays under Electricity.
- Every data type is listed, with the ones your company has data for first. Use the search box to find a specific one.
- Several data types of the same commodity can share a question — for example, two water types that both go to one water question.
- A question can hold only one commodity, and only one fuel type.
Integration hub
The Sphera integration page at Data Export > Integrations > Sphera is a single-page layout:- Page header — Archive (deactivate the integration) and Settings (credentials, site mapping, data types, column names)
- Warning banners — Legacy push-only configuration, or sites not yet mapped to a Sphera site
- Status card — DI + DA connected, DI only (push), Legacy config (push only), or Not configured, with an Export button
- Recent syncs & downloads — Your latest Sphera exports and DI pushes. Use Data Export > History for the full cross-integration log.
- Monthly usage comparison — When the DA channel is configured, a Nectar vs Sphera comparison for each Sphera site
Exporting
Click Export to open the export dialog:Monthly usage comparison
When the DA channel is configured, the comparison section reads the values stored in Sphera and diffs them against Nectar’s monthly usage. Use it to confirm Sphera holds the right numbers and to re-push the ones it does not. Questions collected less often than monthly — for example half-yearly — show one row per reporting period, on the period’s first month, because that is where Sphera stores the value. Periods follow your Sphera fiscal year: with an October fiscal year, half-yearly rows sit on October (October–March) and April (April–September). Re-pushing such a row sends its whole period.- Set the scope with the filters:
- Sphera site (pinned) — One Sphera site at a time, listed with its Sphera ID, name and the Nectar sites mapped to it. Only Sphera sites with at least one mapped, non-excluded Nectar site appear. When several Nectar sites map to one Sphera site, the usage, bills and re-push cover all of them.
- Data type — The Sphera question to compare, shown by its question name (or the questionnaire name when the questionnaire has one question). If several mapped questions share a name, it reads Question · Questionnaire. Only questions you mapped a data type to appear. A re-push from this view sends only the data types mapped to that question.
- Months (required) — The month range to compare; clearing it resets to the current year.
- Read the usage chart — Nectar’s monthly usage and the values stored in Sphera are plotted side by side, both in your company’s preferred unit for that utility. Nectar converts each stored Sphera value from its own unit first. Values in a unit Nectar cannot convert yet are left out of the Sphera total.
- Scan the monthly comparison table — Each row shows the month, Nectar value, Sphera value, the percentage difference, and a status. Expand a month to list the bills that make up Nectar’s total, across every Nectar site mapped to the selected Sphera site; click a bill to open it, or open the matching bills in Data Inventory. Months where Nectar has bills but the usage is zero (for example a gas meter that was idle in summer) are listed with a Nectar value of 0. Months with no bills for the selected data type are not listed.
- Synced — Sphera matches your data for that month, within 0.5%
- Different — Both sides have data but the values differ
- Not on Sphera — Nectar has data Sphera never received
- Missing in Nectar — Sphera holds a value your data no longer produces
- Unit not supported — Sphera stored some values that month in a unit Nectar cannot convert yet. Email support@nectarclimate.com and we will add it.
- Per row — Click Push (for Not on Sphera) or Sync (for Different) to re-push that month.
- In bulk — Click Resync N discrepancies above the table to re-push every drifted or not-on-Sphera month at once.
- All mapped sites — A re-push sends every Nectar site mapped to the selected Sphera site, not one site alone.
Settings
Manage the integration in Settings > Company > Integrations > Sphera:- Connection — Sphera host, API route, and the GUID, connection key, and secret for each channel. Saving always verifies the credentials first, so invalid ones never reach the stored configuration. Leave a secret blank to keep the stored value.
- Site mapping — Nectar sites mapped to the Sphera sites discovered through the DA channel, with exclusions. Refresh sites re-discovers sites after you add them in Sphera.
- Data types — The Sphera questionnaire and question each data type goes to. See Map data types to Sphera questions. Only mapped data types appear in the comparison.
- Column names — Header names for the CSV that Nectar pushes to the DI channel.
Column names
Each exported row is one usage row on a bill, carrying the bill’s account, meter, invoice, and audit-link metadata so values can be traced back to their source. A bill spread over several months is sent as one row per reporting period, each with that period’s share of usage, emissions and allocated cost; the bill-leveldocument's … columns repeat on each row. For meters in a physical meter group, each row’s usage is only the part Nectar counts in your totals, so a fallback bill the primary already covered is sent with zero usage; cost columns are not reduced for this. Most headers are fixed, but these eight are configurable so they can match your Sphera import mapping:
Sphera-ready columns
These columns come after all the others. Sphera matches columns by name, so an existing import mapping keeps working and you can map them whenever you are ready.sphera utility type 1 and sphera utility type 2, and map units and currency with value mappings on usage units and charges units, as described in Step 2.
Rotating credentials
Open the channel in the Connection Center, click More (···) in the detail panel header, and choose Reset the API credentials (the circular-arrow icon). Copy the new key and secret into Settings > Company > Integrations > Sphera and save.
Troubleshooting
FAQ
Where do I find my channel GUID, connection key, and connection secret?
Where do I find my channel GUID, connection key, and connection secret?
What is the difference between the DI and DA channels?
What is the difference between the DI and DA channels?
What utility types can I export to Sphera?
What utility types can I export to Sphera?
Do my Sphera questionnaires need a specific layout?
Do my Sphera questionnaires need a specific layout?
What values do the sphera utility type columns contain?
What values do the sphera utility type columns contain?
ELECTRICITY or GAS, a water type such as WATER_MUNICIPAL_WATER, a fuel type such as PROPANE_GAS, or a waste stream such as WASTE_Landfill (WASTE when the waste has no stream). Both columns carry the same value, so you can route the questionnaire from one and the question from the other. sphera utility type 3 carries the same value too, except that generation meters send ELECTRICITY_GENERATION.My questionnaires are collected quarterly or annually.
My questionnaires are collected quarterly or annually.
term column to the period’s first month. If such a question still shows monthly rows, click Refresh sites in Settings > Company > Integrations > Sphera.Should I use api or ws/rest.php for the API route?
Should I use api or ws/rest.php for the API route?
api. Self-hosted installations typically use ws/rest.php. The value is the URL prefix before the channel path in your Endpoint URL — Nectar appends /di and /da itself.How do I fix a discrepancy?
How do I fix a discrepancy?
I added a new site in Sphera and it is not in the mapping list.
I added a new site in Sphera and it is not in the mapping list.
Can I re-download a past Sphera export?
Can I re-download a past Sphera export?